Panda IDX Dashboard: Domain, Contributors & Subscriptions
Navigate your Panda IDX dashboard, connect your custom domain, manage contributors, and view your subscription — all from one home page.
Your dashboard at a glance
Your Panda IDX dashboard home page is your control center. When you log in, the home page shows four sections: a preview of your live website, video tutorials, your active Subscriptions, and Permissions & Ownership (contributors).
Quick orientation: The left sidebar navigates between features (Pages, Libraries, Stories, Contacts, etc.). The top bar has a search icon (⌘K) for quick access to any setting — including Domain Setup, which is not in the sidebar but is one search away.

Set up your custom domain
Replace your default yourname.pandaidx.com address with your own branded domain (e.g., johnsmith.com). You need access to your domain registrar's DNS settings to complete this — DNS propagation takes 4–48 hours.
Step 1: Open the website dropdown and go to Domain Setup
On your dashboard home, click the ⋯ menu next to View Website (top-right of the site card). Select Domain Setup from the dropdown.
Ready to set up? Go to Domain Setup → — takes about 5 minutes plus DNS propagation time.
Step 2: Add your domain
The Domain Setup page opens. If no domain is connected yet, click Add Domain. Enter your domain (e.g., johnsmith.com or listings.johnsmith.com) and click Continue. Panda generates your DNS records.

Step 3: Copy your CNAME record
Click DNS Records to expand the table. Copy the CNAME type, Name (usually www), and Value (the Vercel hostname). Each field has a copy button. Add this record in your domain registrar's DNS settings.

Subdomain tip: Start with listings.yourdomain.com if this is your first custom domain. Subdomains need only one CNAME record and verify in minutes at most registrars. You can always point the root domain later.
DNS changes can take up to 48 hours to propagate worldwide. If your domain shows Invalid Configuration after adding the record, wait a few hours and use the Refresh button on the Domain Setup page before contacting support.
Invite contributors
Give team members, assistants, or other agents access to your dashboard. Each contributor gets a role that limits what they can see and edit.
Step 1: Scroll to Permissions & Ownership
On your dashboard home page, scroll down past Subscriptions to the Permissions & Ownership section. It shows all active contributors and their roles. Click + Invite Contributor in the top-right.

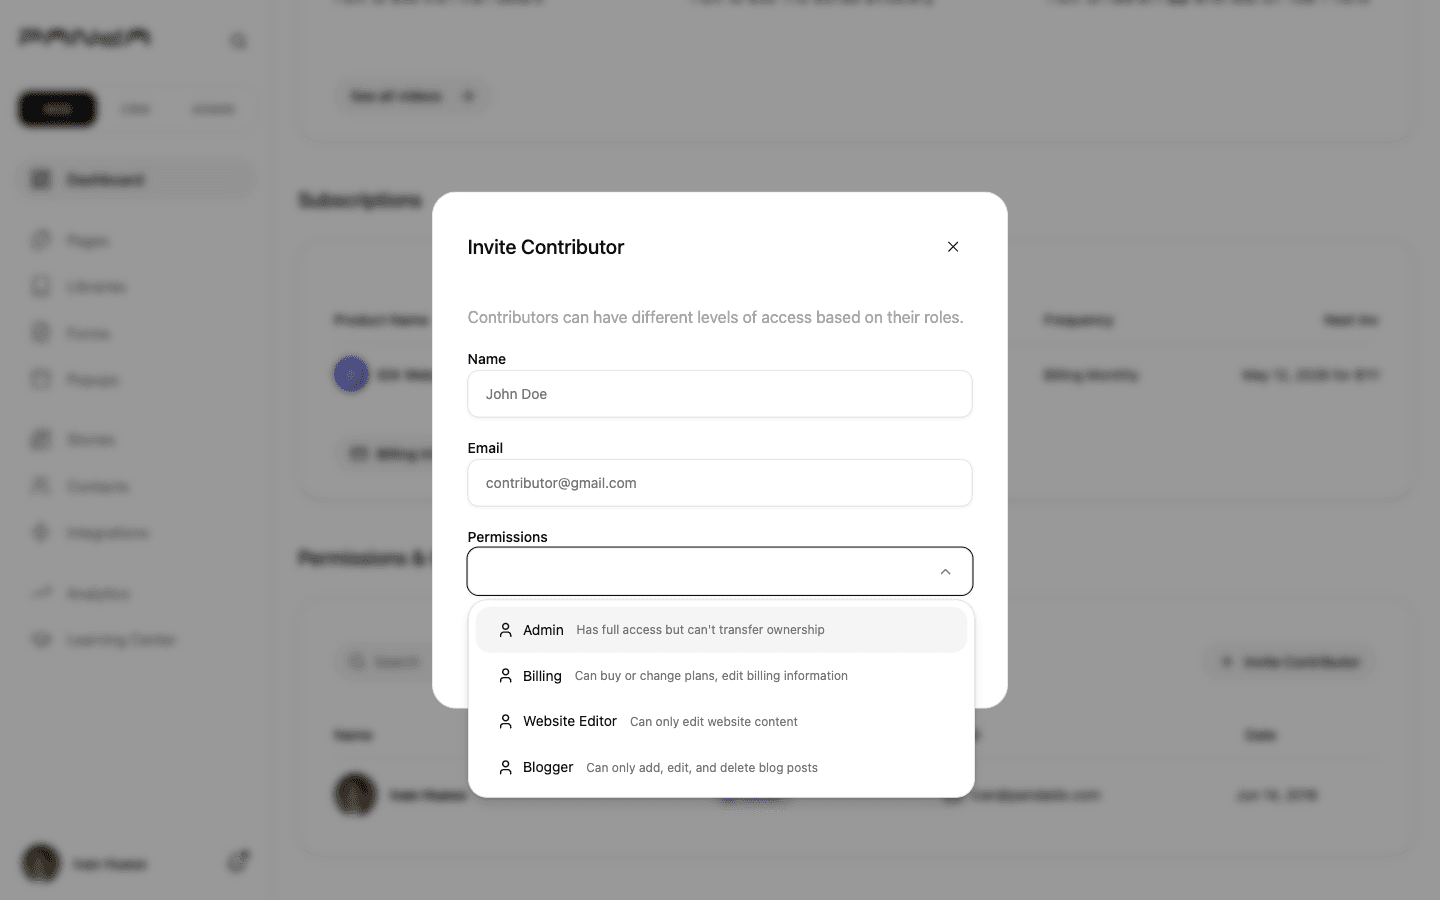
Step 2: Fill in the Invite Contributor form
The Invite Contributor dialog opens. Enter the contributor's Name, Email, and select a Permission role. Click Invite — they receive an email to create their account.
Invite your first contributor: Go to your dashboard → — they get an email to create their account and join your site.
Step 3: Contributor receives invite and joins
The contributor receives an email with a link to set their password. Once accepted, their name, role badge, and email appear in the Permissions & Ownership table.
The Website plan includes 2 contributor seats. The Website + CRM and Custom plans include unlimited contributors. If you hit your seat limit, the invite dialog shows an upgrade prompt.
Manage your subscription
Your active plans appear in the Subscriptions section on the dashboard home page. From here you can review plan details, monitor billing dates, and access the Stripe billing portal to update your payment method.
Step 1: Review your active plan
Scroll down on the dashboard home to Subscriptions. Each row shows the plan name, status badge (Active / Failed), billing frequency, and next invoice date and amount.
Step 2: Click your plan to see what's included
Click any subscription row to open the plan details dialog. It shows your current status, billing cycle, next invoice amount, and the full list of features included in your plan.

Step 3: Update billing or payment method
Click Billing Information (below the subscriptions table) to open the Stripe billing portal in a new tab. From there, update your credit card, download past invoices, or cancel your plan.

If your plan status shows Failed, your payment method needs to be updated. Click Billing Information immediately to avoid a service interruption — your website stays live for a grace period but features may be restricted.
Frequently asked questions
What DNS record do I need to connect my domain to Panda IDX?
You need to add a CNAME record at your domain registrar (GoDaddy, Namecheap, Cloudflare, etc.) pointing to the Panda IDX hostname. The Domain Setup page shows the exact Type, Name, and Value to copy. DNS propagation typically takes 4–48 hours after you add the record.
Can I use a subdomain instead of a root domain?
Yes. Subdomains like listings.yourdomain.com often verify faster and are simpler to configure at most registrars. Both root domains and subdomains are fully supported — enter whichever you prefer in the Add Domain dialog.
What permissions can I assign to contributors?
Available roles are Admin (full access), Billing (subscription management only), Website Editor (content editing only), and Blogger (stories and blog posts only). The Site Owner role is assigned automatically to the account creator and cannot be transferred.
How many contributors can I add to my Panda IDX account?
The Website plan includes 2 contributor seats. The Website + CRM and Custom plans include unlimited contributors. Your current seat usage is shown in the Permissions & Ownership section on your dashboard home page.
How do I update my payment method for my Panda IDX subscription?
From the dashboard home page, scroll to Subscriptions and click Billing Information. This opens the Stripe billing portal where you can update your credit card, download past invoices, and manage billing preferences.