Contact Page: Background Image & Lead Form

Set up your Panda IDX contact page: upload a background image and connect a lead form that routes every submission directly to your CRM — no coding needed.

What the Contact Page does

Your Contact Page is a focused, single-screen space: a full-height background image on the left and a lead capture form on the right. Visitors see the complete page without scrolling — no map, no address block, no social feed. Just your best image and a clear invitation to reach out.

Dashboard → Pages → Contact Page: one setting — the background image. The contact form is managed separately in Forms and automatically appears on the right side of the page.

Live Panda IDX contact page showing a split layout with a team photo on the left half and a Contact Us form with name email phone dropdown and message fields on the right half

Upload your background image

The background image is the only setting in the Contact Page dashboard editor — and it carries the visual weight of the page.

1

Step 1: Open the Contact Page editor

2

In the dashboard sidebar click Pages, then click Contact Page. The editor shows a single Background Image upload card and a Preview button in the top-right.

3
Panda IDX dashboard Contact Page editor showing a single Background Image upload card with Drag and drop or click area and a Preview button in the top-right corner
4

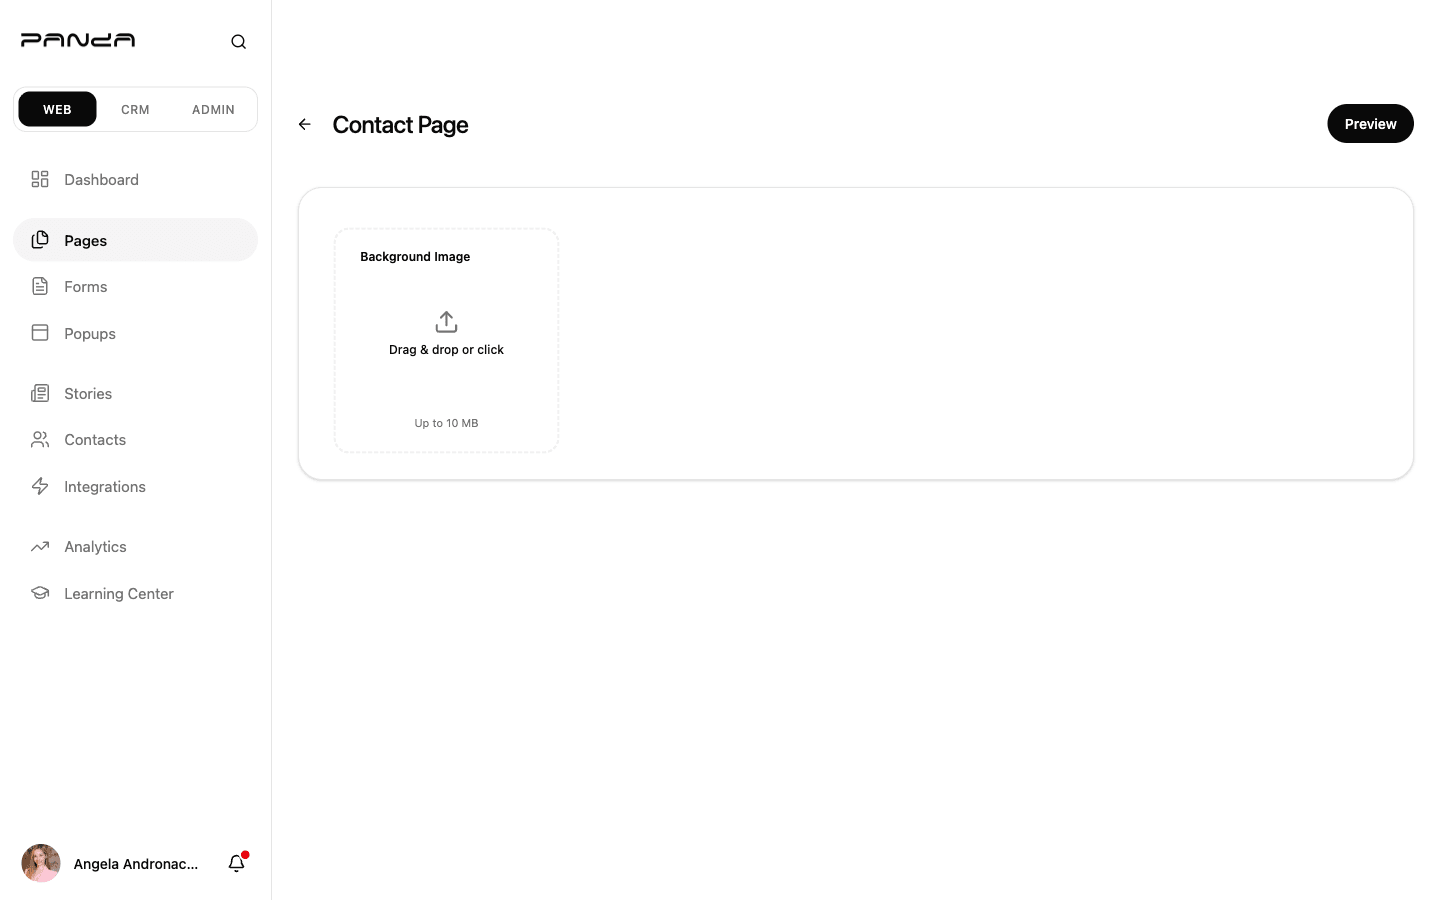
Step 2: Upload your photo

5

Click the upload area (or drag and drop). Any JPG or PNG up to 10 MB works. The image fills the entire left half of the live contact page — full height, no crop constraints.

6
Background Image upload card in Panda IDX Contact Page editor showing upload icon with Drag and drop or click text and Up to 10 MB size limit
7

Step 3: Preview the result

8

Click Preview to open your live contact page. Verify the image fills the left panel cleanly and the form appears on the right.
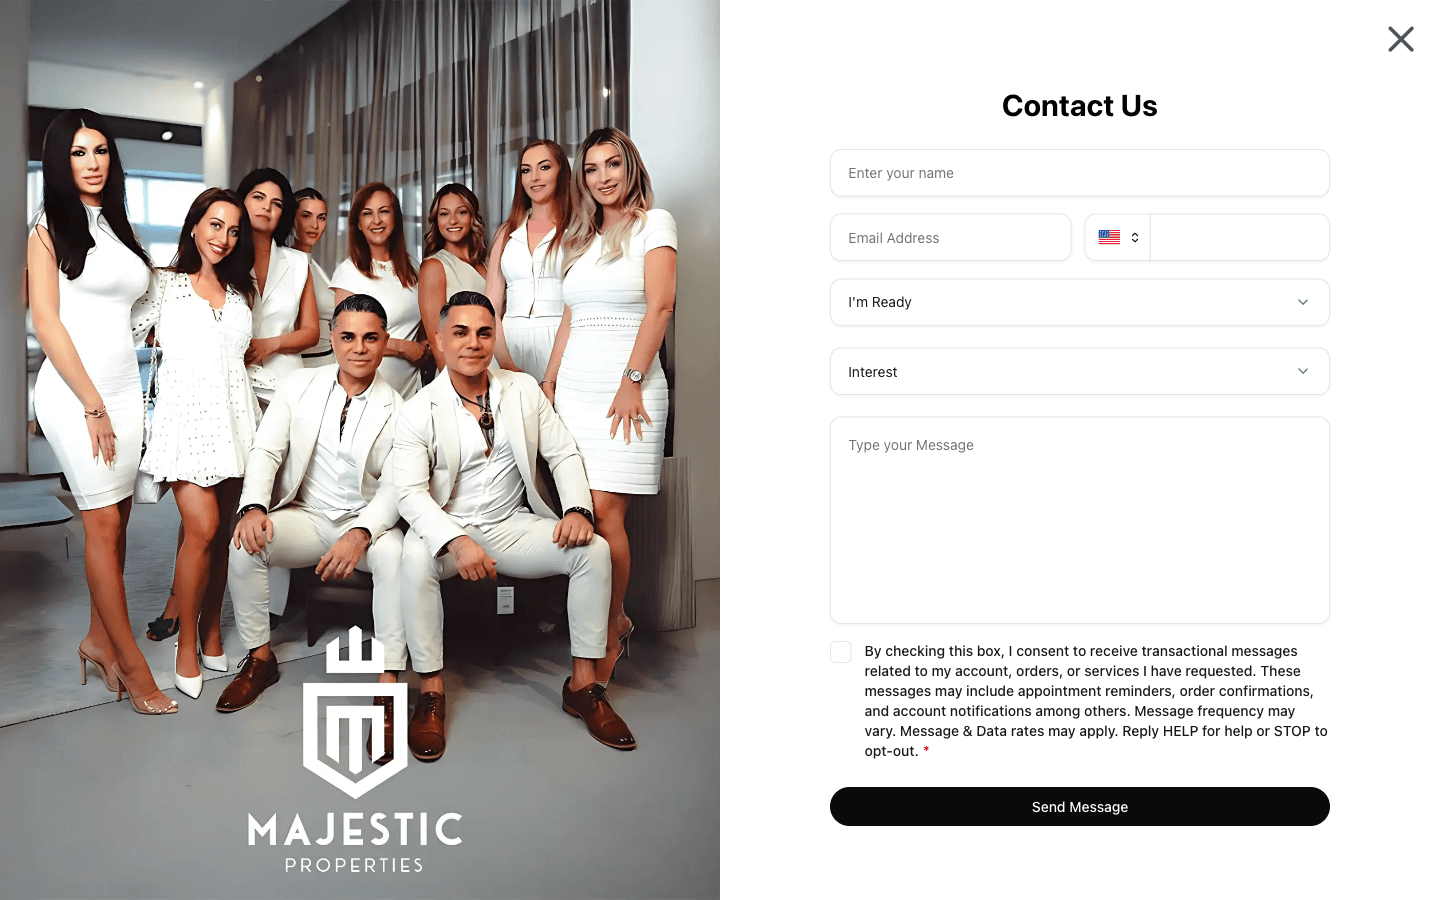
9
Live contact page preview showing professional team photo filling the left half and Contact Us form with all fields visible on the right half in a split screen layout

Use a landscape or portrait photo that works at full height. Team photos, luxury property shots, and lifestyle images all work well. Avoid images with important content near the edges — the left panel crops to fill the viewport height.

Your contact form

The form on the right side of the page is not configured in the Contact Page editor. It's built and managed in the Forms builder, then automatically assigned to the contact page slot.

The default form includes:

FieldTypeGoes to CRM?
NameText (required)contacts.name
EmailEmail (required)contacts.email
PhonePhone + country pickercontacts.phones[]
I'm ReadyDropdown (timeline)✅ Additional fields
InterestDropdown (buy/sell/rent)✅ Additional fields
MessageTextarea✅ Inbox only
SMS consentCheckbox (required)Consent only

To add, remove, or relabel fields — or to replace the default form entirely — go to Forms in the dashboard.

Contact Us form on live Panda IDX site showing name input, email and phone fields side by side, I'm Ready and Interest dropdowns, message textarea, SMS consent checkbox, and Send Message button

What visitors see and how leads flow

When a visitor submits your contact form, Panda IDX handles the entire lead pipeline automatically — no Zapier, no third-party CRM webhook setup required.

1

Step 1: Visitor fills and submits the form

2

The form validates in the browser. On submit, a "Message sent successfully!" toast confirms receipt. No page redirect.

3
Panda IDX contact page with Send Message button highlighted at the bottom of the form panel showing how a visitor submits the contact form
4

Step 2: Lead appears in your CRM instantly

5

Panda IDX creates a contact record (stage: new-lead) in your dashboard, adds an inbox message with the full form response, sends you an email notification, and logs the visitor's UTM source and page analytics — all in one transaction.

6

The Message field from the form goes to your Inbox, not the contact record itself — check Inbox to read the visitor's full message. Contact name, email, and phone appear in Contacts.

Frequently asked questions

What should I put on my real estate contact page?

One compelling background image and a working lead form. The default form captures name, email, phone, timeline readiness, and a message — enough for a lead to identify themselves without friction. Every extra required field you add reduces submission rates, so keep it lean.

Can I customize the contact form?

Yes. Go to Forms in your dashboard to edit field labels, add or remove inputs, and control which fields are required. Any form you assign to the "contact" placement appears automatically on your contact page.

How do I add a map to my contact page?

The contact page uses a split layout — your image on the left, the form on the right. There's no dedicated map embed. To show your office location, add your address to your site footer via General Settings, or add a location field to your contact form.

Will contact form leads go to my CRM automatically?

Yes. Every submission creates a contact record, an inbox message, and an email notification — automatically. No extra integrations required. See Contacts and Inbox for how to manage incoming leads.

What office hours should I list on my real estate website?

The contact page doesn't have an office hours field. Add your hours to your site footer via General Settings, or add a "Best time to reach me" dropdown to your contact form in the Forms builder. List hours you'll actually answer — not aspirational availability.